A blog is a great way to generate traffic, build a platform, and get your brand or voice out there on the internet. Your blog should be as individual as its creator, to get the most attention and attract readers. This tutorial will guide you through the steps to creating a beautiful minimalistic designthat’s sure to help your blog become a success.
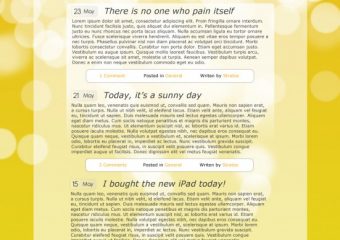
Final Result

Step 1: Create a new document
Start by creating a new document in Photoshop with 1024px width and 1200px height.
Step 2: Bokeh Background Image

You can download this background image here or you can follow this tutorial to make your own.
Step 3: Drawing the layout

Grab the Rounded Rectangle Tool (Radius: 5px), draw a 825x940 shape in the middle of the document and reduce its Opacity to 60%.
 (Font used: Daniel)
Then, take the Horizontal Type Tool and write a title for your theme (like My Personal Blog).

Grab the Rounded Rectangle Tool (Radius: 5px) again, draw a 626x418 shape in the middle of the bigger shape and reduce its Opacity to 75%. Add a Layer Mask, take the Gradient Tool, select the black/white combination and grab it from bottom to top.

Take again the Rounded Rectangle Tool (Radius: 5px) and draw a 81x39 shape on the left top corner. Then, set its Opacity to 50%.

Add some icons (like Rss Feed and Twitter) and set their Opacity to 80%.
Step 4: Drawing the content

Let’s start from the date of the posts. Grab the Rounded Rectangle Tool (Radius: 5px), draw a 76x29 shape and reduce its Opacity to 40%. Go to Layer > Layer Style > Drop Shadow… and use the above settings.
 (Colors used: #ffffff – #d4d4d4)
Then, select Gradient Overlay and use these settings.
 (Font used: Antipasto)
Add the days’ number and the month (like 23 May).

With the Rounded Rectangle Tool (Radius: 5px), draw a 504x38 shape about 160px down from the posts’ date and go to Layer > Layer Style > Drop Shadow…. Use the above settings.
 (Font used: Verdana)
Take the Horizontal Type Tool, add some text (like Comments, Categories, Author) and color the text links with #ffa200.
 (Font used: Verdana)
Finally, with the Horizontal Type Tool, add the title of the post (I used Italic decoration) and the post text.
Step 5: Adding Newset/Older Entries Links
 (Font used: Verdana)
Last step and you have to write the “<< Newest Entries” and “Older Entries >>” after all the posts.
Final Result